- Decision: Accept
- Decision: Manual review
- Decision: Reject
- Adding evaluations to a decision
- Renaming a decision
- Adding conditions for decision results
- Adding decision subgroups
- Deleting evaluation decision
Understanding decision execution order
Before configuring evaluation decisions, it’s important to understand how decisions are executed within an evaluation node. In GO, evaluation decisions execute sequentially from top to bottom, similar to if-else statements. If the first decision at the top of the decision tree has no conditions, then the workflow defaults to that first decision. To prevent this, ensure that all decisions from top to bottom have conditions that must be met. As long as conditions are set for each decision, the workflow won’t default to the first decision. In other words, ensure your first decision includes a condition.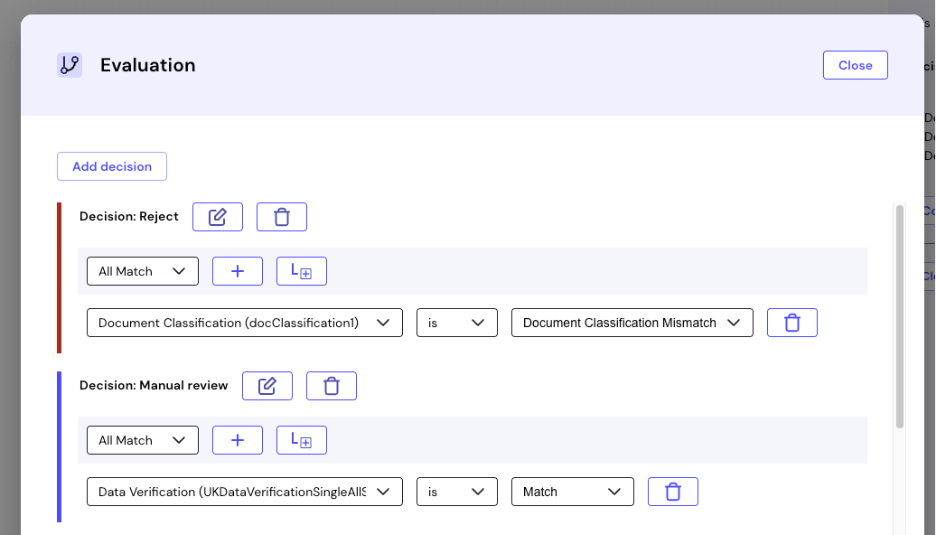
If two or more decisions are true at the same time, only the first one is executed.
Add a decision
In an evaluation, you can add as many decisions as needed to ensure a strong verification process based on your use case. Follow the steps below to add a new decision.- Click Evaluation.
- Click Configure decisions.
- Click Add decision. A new decision appears at the bottom of the window. You can now build decision rules in the provided query builder.
If none of the decisions are met during a verification process, the default decision is Decision: Manual review. You can select a default decision from the list.
Change decision name
Renaming decisions helps you identify and manage them more easily, especially when you are working with multiple evaluations or complex journeys. Follow the steps below to change the name of the evaluation decision.- Click Evaluation.
- Click Configure decisions.
- Click Rename outcome next to the decision you want to rename.
- Type the decision name of your choice into the text input field.
- Click Done.
Add decision condition
Conditions are the rules that automatically decide what happens based on module verification outcomes. Think of them as if-then statements, for example, if you added an evaluation after a Data Verification module, you could configure a decision that works like this: If Data Verification is No Match, then Decision: Reject. Follow the steps below to add conditions for a decision.- Click Add condition next to the .
- Select and configure conditions from the condition list.
Add subgroup to decision
A subgroup allows you to build nested conditional logic within your evaluation decisions. They let you group conditions together and apply different logic operators to each group. Subgroups allow you to build logic to create better outcome conditions to fit your use case. Follow the steps below to add a subgroup to a decision.- Click Add sub group. A subgroup appears at the bottom of the decision.
- Configure evaluation subgroup decisions.
View existing decisions
As a user, you can view existing decisions that were previously configured. Follow the steps below to view existing decisions.- Click Evaluation.
- Click Configure decisions.
Edit existing decisions
As a user, you can make edits and configurations to existing decisions. Follow the steps below to edit existing decisions.- Click Evaluation.
- Click Configure decisions.
- Edit the decision and condition parameters as needed. For example, you can configure conditions based on modules connected to an evaluation node. For instance, if an evaluation was added to a Name Match module, Name Match (NameMatch) appears in the condition list. Select the module from the list, then modify the conditions by changing the operator from is not to is and updating the value from IsNameMatch to Error. This leads to a Decision: Reject.
Delete decisions
Click the delete icon to remove a decision or condition from an evaluation.Outcomes and decisions are evaluated in order from top to bottom. When a condition is met, that result is returned and processing stops. For example, in a NameMatch module, if customer names match correctly, the system immediately returns the IsNameMatch outcome. All remaining configured outcomes are skipped.