

The Invite a customer action is only available for published Hosted journeys. If your journey collects information before it starts, then the action is unavailable. See When the invite action is unavailable.
Before you begin
Ensure you have the following:- A GBG Go platform account. If you don’t have an account, then contact your GBG account manager.
- The necessary modules and variants enabled in your contract.
- A licence and credentials for the User Invite module set up for your organisation. If you don’t have these, then contact your GBG account manager.
Create your first single user invite
This quickstart uses the PEPs and Sanctions standard module as an example. You can use any module that suits your use case.Step 1: Log in to GBG Go
If you are an existing customer, then go to Step 2.- Navigate to the GBG Go sign-in page, and then click Customer Sign In.
- Enter your email address, and then click Log In.
- Click Forgot your password? GBG Go sends a recovery code to your email.
- Enter the recovery code and create your new password.
- Click Change password to complete the setup.
- Log in with your email and new password.
Step 2: Create a hosted journey
- Click on the Create a new journey list.
- Select API + hosted (latest). This opens the Journey builder, allowing you to design hosted journey workflows.
- Click the edit icon on the journey name at the top of the editor.
- Enter a meaningful name, for example, “PEP & Sanctions Screening - New Customers.”
- Click outside the name field to save it.
Step 3: Add the PEPs and Sanctions module
- Go to Browse and add modules in the right sidebar.
- Use the search bar to find PEPs and Sanctions.
- Click the module. This opens the module configuration panel.
- Click Add to journey to insert it into the flow.
- Click the module inside the Journey builder to open its configuration panel.
- Click Close to apply your configuration.
Step 4: Publish the journey
Click Publish to Preview in the Journey builder. GBG Go displays a confirmation message. Next, click Dashboard to see:- Environment (Preview)
- Version number
- Resource ID
- Last published
- Actions list
Step 5: Send the invite
- Click the Actions list.
-
Click Invite a customer. A dialog box appears.
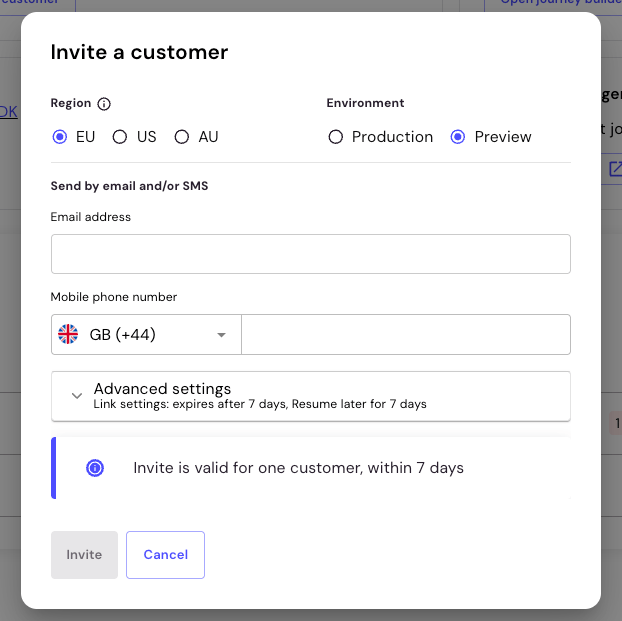
Invite a customer dialog box
-
Select the options for your use case, and then enter an email address, a mobile number, or both. The dialog contains the following options:
The GBG Go platform presets the region and environment based on the journey that you selected. Change the region only if your organisation runs journeys in more than one region, because the region controls where your customer’s data is processed and stored. You must enter an email address or a mobile number before the Invite button becomes available.
- Click Invite. A message appears at the top right of the screen confirming that the invite started. Your customer receives the verification link and fills out their information. The GBG Go platform then processes the data through the modules in your journey. It reaches a decision based on your journey configuration.
- Review the outcome in Investigate once your customer completes the journey.
An invite is valid for one customer. By default it expires after seven days, and your customer can return to the journey if they close it before they finish. The link stops working once they complete the journey or it expires. To change either default, see Link settings.
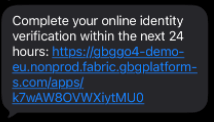
Invite as your customer receives it by text message
When the invite action is unavailable
The Invite a customer action is unavailable when any of the following applies:- The journey collects information before it starts. An invite can’t carry pre-filled details into a journey that asks for them up front.
- The journey isn’t published.
- Your organisation doesn’t have a licence or credentials set up for the User Invite module.
Next steps
- Create and start Hosted journeys with the API: Low-code quickstart.
- Learn more about Hosted journeys: Hosted journeys overview.
- Invite a customer to a journey built for a specific verification task: No-code guides.
- Review customer session results and submitted data: Investigate overview.
- Check whether an invite reached your customer: View notifications.