

The Invite a customer action is only available for published Hosted journeys. If your journey collects information before it starts, then the action is unavailable. See When the invite action is unavailable.
Before you begin
Ensure you have the following:- A GBG Go platform account with a customer admin role. This role lets you review the result in Investigation. If you don’t have this role, then contact your GBG account manager.
- The Proof of Address Extraction module enabled in your contract.
- A licence and credentials for the User Invite module set up for your organisation.
- A proof of address document that you can photograph, such as a utility bill or a bank statement.
- An email address or mobile number that you can receive the invite on, so that you can complete the journey as your customer.
Which module to use
Two modules handle supporting documents, but only one of them works with No-code.
Document Attachments takes its documents from the
context.subject.documents object at journey start, so you must supply the files yourself before your customer begins. An invite carries no data, which means No-code can’t provide them. Use Low-code delivery for that module instead. See Document Attachments and Hosted journeys overview.
This guide therefore uses Proof of Address Extraction, which collects the document from your customer on a hosted screen.
Step 1: Create a Hosted journey
- Click on the Create a new journey list.
- Select API + hosted (latest). This opens the Journey builder, allowing you to design Hosted journey workflows.
- Click the edit icon on the journey name at the top of the editor.
- Enter a meaningful name, for example, “Proof of Address - New Customers.”
- Click outside the name field to save it.
Step 2: Add the Proof of Address Extraction module
You select a variant as part of adding the module.- Go to Browse and add modules in the right sidebar.
- Use the search bar to find Proof of Address Extraction.
- Click the module. This opens the module configuration panel, which lists the available variants.
- Select the Proof of Address extraction variant.
- Click Add to journey to insert the module into the flow.
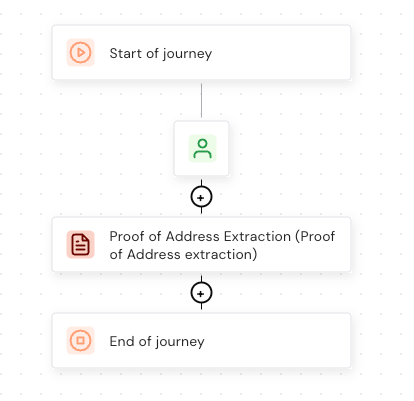
The Proof of Address Extraction module in a Hosted journey
Modules and variants marked with an orange warning icon require activation by the GBG team. If the variant you need is marked, then contact your account manager to enable it for your organisation.
(Optional) Step 3: Configure the module outcomes
The module arrives pre-configured with the following outcomes, so you can skip this step and go to Step 4:
Each outcome is built from one or more rules. A rule tests a capability, which is a single data point the module produces. The module provides the following capabilities:
By default, the Proof Of Address Extraction Successful outcome tests the extraction result alone. Adding Address Is Present as a second rule means the outcome also confirms that an address was found.
To add a rule to the Proof Of Address Extraction Successful outcome:
- Click the module inside the Journey builder.
- Click Configure outcomes.
- Find the Proof Of Address Extraction Successful outcome.
- Click the add icon next to All Match.
- Select Address Is Present from the fields list.
- Set the operator and the value for the rule.
Step 4: Publish the journey
Click Publish to Preview in the Journey builder. GBG Go displays a confirmation message. Next, click Dashboard to see:- Environment (Preview)
- Version number
- Resource ID
- Last published
- Actions list
Step 5: Invite your customer
- Click the Actions list.
-
Click Invite a customer. A dialog box appears.
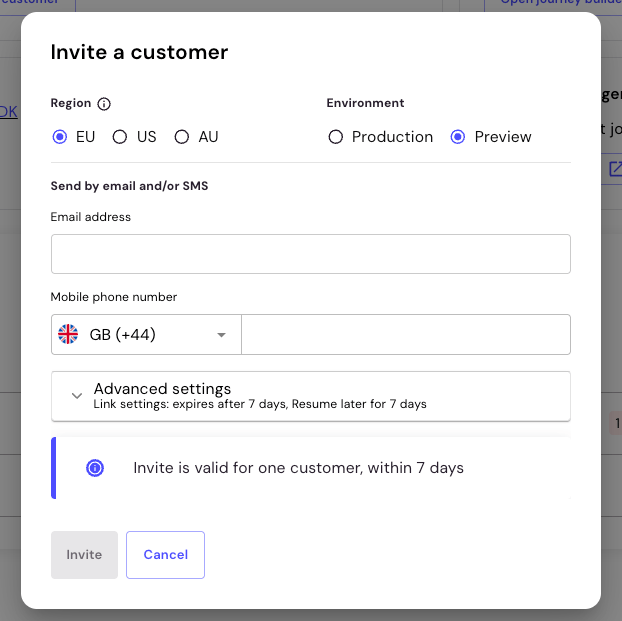
Invite a customer dialog box
-
Select the options for your use case, and then enter an email address, a mobile number, or both. The dialog box contains the following options:
The GBG Go platform presets the region and environment based on the journey that you selected. Select Preview while you test the journey. Change the region only if your organisation runs journeys in more than one region, because the region controls where your customer’s data is processed and stored.
- Click Invite. A message appears at the top right of the screen confirming that the invite started.
An invite is valid for one customer. By default it expires after seven days, and your customer can return to the journey if they close it before they finish. To change either default, see Link settings.
Step 6: Complete the journey as your customer
Your customer receives a verification link by email or text message.- Open the link from the invite.
- Photograph your proof of address document when the journey asks for it.
- Submit the document.
Step 7: Review the extraction result
Results are available in Investigation once your customer completes the journey.- Click Investigation on the left navigation menu. The Investigation dashboard opens.
- Select the environment that you sent the invite to. If you are testing, then click the Preview Environment tab.
- Select the region that you sent the invite to, using the region list in the top-right corner.
- Find your customer’s session in the list. If the list is long, then click Add Filter to search by name or email address.
- Click the session ID. The session details page opens on the Processing tab.
- Find the Proof of Address Extraction module in the list. The outcome appears on the right of the module name, for example, Proof Of Address Extraction Successful.
- Click the arrow on the module row to expand it. The module shows each rule it evaluated, and whether that rule returned true or false.
- Click More details to drill into the module on its own page, and review the details read from the document.
Next steps
- Change the decision on a session after your review: Change decisions.
- See everything a session records: View details of a journey session.
- Collect supporting documents that don’t need reading: Document Attachments.
- Verify an identity document rather than an address document: Identity document verification.
- Invite a customer to a journey built for another verification task: No-code guides.