> ## Documentation Index
> Fetch the complete documentation index at: https://docs.go.gbgplc.com/llms.txt
> Use this file to discover all available pages before exploring further.
# Run the age verification API sample app
> Run the gaming age verification API sample app against your own journey, using the GBG Go Journey API v2.
In this tutorial, you'll run a working player sign-up application against your own GBG Go journey.
The source for this sample app is on GitHub:
* [go-sample-frontend](https://github.com/gbgplc/go-sample-frontend): the React front end, shared by all three sample apps.
* [go-sample-backend-java](https://github.com/gbgplc/go-sample-backend-java): the Java backend.
* [go-sample-backend-typescript](https://github.com/gbgplc/go-sample-backend-typescript): the TypeScript backend.
You need the front end and one backend. Both backends expose the same HTTP API, so the front end works with either.
## What this tutorial covers
By the end, you'll have a player sign-up application that:
* Starts a verification journey through the Go Journey API v2.
* Renders each screen from the journey's own configuration, rather than from hardcoded forms.
* Collects identity details, contact details, a current and previous address, a photo ID, and a selfie.
* Confirms the player meets the age requirement and screens them for financial vulnerability.
* Polls for the outcome and shows the decision, including a referral to manual review.
When a journey finishes, you can see it in the [Investigation](/docs/go-v2/platform/investigate/overview) portal.
This is the API sample app tutorial. It covers the API-first integration only, and does not cover the SDK or hosted journeys. For how the sample apps are built and what they share, see the [Sample applications overview](/docs/go-v2/tutorials/sample-apps-overview).
## Prerequisites
* Access to the Go dashboard, with permission to create and publish journeys.
* Licences for the modules this tutorial uses. Licences are assigned to your department by GBG, and an unlicensed module shows a warning icon in the Journey builder.
* An API client. See [Manage API clients](/docs/go-v2/platform/account-management/manage-api-clients) for how to create one and get your client ID and secret.
* Node.js v18 or higher, for the front end and the TypeScript backend.
* JDK 21 and Maven, only if you choose the Java backend.
* Git, to clone the sample repositories.
The modules this journey uses are Document Classification v2, Document Extraction v2, Document Authentication v2, Facematch Verification, PEPs and Sanctions Standard, Address Verification (Global), Financial Vulnerability, Age Verification, and Data Verification.
## Part 1: Build the journey
The application renders its screens from whatever your journey collects, so the journey comes first.
A gaming journey has two obligations beyond confirming identity. It has to establish that the player is old enough, and it has to flag signs of financial vulnerability so that safer gambling measures can follow.
The finished journey looks like this. Nine modules run in sequence, then one evaluation node routes the player to accept, reject, or manual review.
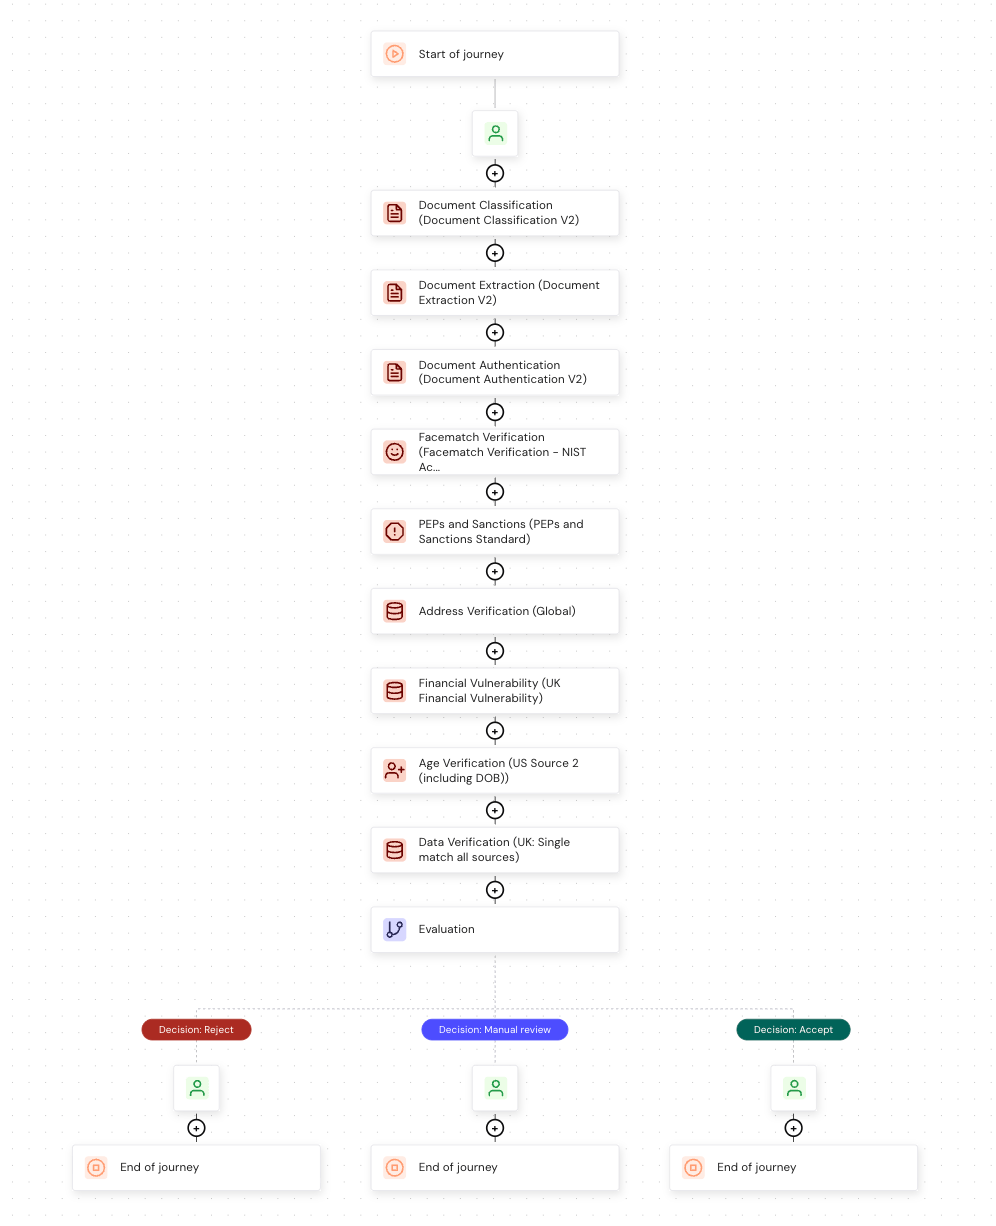 In the Journey builder, add these modules in order:
| Module | What it does |
| - | - |
| Document Classification (Document Classification V2) | Identifies the document and confirms it is a type you accept |
| Document Extraction (Document Extraction V2) | Reads the data fields off the document |
| Document Authentication (Document Authentication V2) | Checks the document is genuine |
| Facematch Verification (Facematch Verification - NIST) | Compares the selfie against the document photo |
| PEPs and Sanctions (PEPs and Sanctions Standard) | Screens the player against politically exposed person and sanctions lists |
| Address Verification (Global) | Confirms the address is real and matches the player |
| Financial Vulnerability (UK Financial Vulnerability) | Returns a risk signal used for safer gambling checks |
| Age Verification (US Source 2 (including DOB)) | Confirms the player meets the age requirement |
| Data Verification (UK: Single match all sources) | Matches the player's details against trusted data sources |
Select the **v2** variant of each document module, for example **Document Classification v2** rather than **Document Classification**. The v2 variants are built for this API.
For instructions, see [Configure modules](/docs/go-v2/platform/journey-builder/configure-module).
Address Verification takes the country from its own settings rather than from the player's address, so it needs setting before the journey runs.
1. Click the **Address Verification (Global)** module in the journey.
2. Click **Settings**.
3. In the **Country** field, enter the ISO3 code for the country you verify addresses in, for example `GBR`.
4. Click **Save all settings**.
ISO3 codes are the GO platform convention, so `GBR`, `FRA` or `DEU`. An ISO2 code such as `GB` is also accepted. For US addresses, use the dedicated US variant instead, which is certified for USPS DPV and CASS.
Add an **Evaluation** node after the modules and configure these three decisions. For how to add and configure one, see [Set up evaluation](/docs/go-v2/platform/journey-builder/set-up-evaluation).
| Decision | Classification | Match | Conditions |
| - | - | - | - |
| Reject | Negative | Any Match | PEPs and Sanctions is MATCH, Financial Vulnerability is High Risk, or Age Verification is Under Age |
| Manual review | Neutral | Any Match | Financial Vulnerability is Medium Risk, or Document Authentication is Medium Risk |
| Accept | Positive | Any Match | Document Classification is Document Classified, Document Extraction is Extraction Successful, Document Authentication is Low Risk, PEPs and Sanctions is NO MATCH, Financial Vulnerability is Low Risk, or Age Verification is Of Age |
Set the classification on each decision as shown. The application reads it to choose a result screen, where `positive` renders an approval, `negative` a decline, and `neutral` a referral to manual review.
Give each decision branch an **End of journey** node.
Click **Publish to Preview**. You'll see the confirmation message *Delivery deployed successfully*.
Use Preview while you build and test. Publish to Production when you're ready for real players. The application works the same against either, and only the resource ID changes.
Go to **Dashboard** in the Journey builder and copy the **Resource ID** and **Version number**.
You'll combine them as `@`, for example:
```
3e1582a0e437a4ceb5fffb0f9f1a0340cc4073d47cac7e034a97a92ba2115237@xn0ajeh5
```
Pin the exact version rather than using `@latest`. Every republish creates a new version, and a pinned application keeps running the version you tested until you change it deliberately.
## Part 2: Set up the backend
Clone the backend in the language you prefer. Both expose the same HTTP API, so the front end works with either.
```bash theme={null}
git clone https://github.com/gbgplc/go-sample-backend-java.git
cd go-sample-backend-java
```
`.env.local` is listed in `.gitignore`, so Git doesn't track it. Never commit your client secret, and never put it in `application-*.yml`.
Create a file named `.env.local` in the repository root:
```bash theme={null}
GBG_CLIENT_ID=your-client-id
GBG_CLIENT_SECRET=your-client-secret
```
Open `src/main/resources/application-ridgeline-play.yml` and set your journey:
```yaml theme={null}
app:
resource-id: your-resource-id@your-version
```
Start the service in live mode:
```bash theme={null}
./run.sh ridgeline-play live
```
It listens on `http://localhost:8083`. The script finds JDK 21, loads `.env.local`, and starts the right profile.
```bash theme={null}
git clone https://github.com/gbgplc/go-sample-backend-typescript.git
cd go-sample-backend-typescript
npm install
```
`.env.local` is listed in `.gitignore`, so Git doesn't track it. Never commit your client secret, and never put it in a market config.
Create a file named `.env.local` in the repository root:
```bash theme={null}
GBG_CLIENT_ID=your-client-id
GBG_CLIENT_SECRET=your-client-secret
```
Open `lib/config/markets/ridgelinePlay.ts` and set your journey:
```typescript theme={null}
resourceId: 'your-resource-id@your-version',
```
Start the service in live mode:
```bash theme={null}
npm run dev:ridgeline-play:live
```
It listens on `http://localhost:8083`.
Both backends also have a mock mode that needs no credentials, which is useful for working on the front end alone. The `live` command is what switches them to your real journey.
### Set your region
The samples default to the EU platform. If your tenant was provisioned elsewhere, then change the base URL and the region together:
Change both values. Authentication succeeds regardless of region, so a mismatch shows up later as journey calls failing against the wrong host.
In `application-ridgeline-play.yml`:
```yaml theme={null}
go:
region: us
base-url: https://us.platform.go.gbgplc.com/v2/captain/
```
In `lib/config/markets/ridgelinePlay.ts`:
```typescript theme={null}
go: {
region: 'us',
baseUrl: 'https://us.platform.go.gbgplc.com/v2/captain/',
},
```
## Part 3: Set up the front end
The front end is one repository holding three applications. This tutorial uses the gaming one.
```bash theme={null}
git clone https://github.com/gbgplc/go-sample-frontend.git
cd go-sample-frontend
npm install
```
Create `apps/ridgeline-play/.env.local`:
```bash theme={null}
NEXT_PUBLIC_ONBOARDING_TRANSPORT=rest
NEXT_PUBLIC_API_BASE_URL=http://localhost:8083
```
`NEXT_PUBLIC_*` values are compiled into the browser bundle. Never put credentials here. They belong in the backend's `.env.local`.
Start the front end:
```bash theme={null}
npm run dev:ridgeline-play
```
Open `http://localhost:3002`. With the backend already running, you'll land on the first screen of your own journey.
If you see the **Sign up** screen, the whole chain is working, from the browser through the front end and backend to GBG Go.
To understand the request flow the app uses, and how it renders screens from your journey, see [How the applications are built](/docs/go-v2/tutorials/sample-apps-overview#how-the-applications-are-built).
## Troubleshooting
This journey asks for six address components rather than the three some journeys use, so a screen plan written against a shorter address submits an incomplete element and the journey stays on that screen.
The screen plan doesn't recognise something the journey collects, so the app falls back to a plain form rather than stalling.
This usually means the journey changed after the plan was written. Check the backend log for `No screen mapped for outstanding elements`, which names the unmapped elements, then add them to the screen plan.
The journey's required fields changed under the same resource ID. A republish can add required elements, so an address that needed three components can come back needing six, and a screen plan written against the old shape submits an incomplete element.
Re-read `collects` after every republish rather than assuming the shape holds.
The backend keeps sessions in memory, so restarting it invalidates every session in progress. Start a new journey.
For the same reason, the samples run one journey per browser tab. The session ID lives in `sessionStorage`, so reloading resumes the journey, but a new tab starts a fresh one.
The region is mismatched. The token endpoint is global, so authentication works regardless, but journey calls go to a regional host. Check that `region` and `base-url` name the same region.
A module that errors is different from one that declines, because nothing was decided about the customer.
Open the journey in the [Investigation](/docs/go-v2/platform/investigate/overview) portal and look at the failing step. It carries an error code, a problem description, a suggested action, and a correlation ID. Quote the correlation ID when contacting support, because it identifies the exact execution.
## Next steps
See the journeys you ran, module by module, in the Investigation portal.
Change what each module reports, and how your evaluation turns those into decisions.
Move from Preview to Production when you're ready for real customers.
The full Journey API v2 reference.
In the Journey builder, add these modules in order:
| Module | What it does |
| - | - |
| Document Classification (Document Classification V2) | Identifies the document and confirms it is a type you accept |
| Document Extraction (Document Extraction V2) | Reads the data fields off the document |
| Document Authentication (Document Authentication V2) | Checks the document is genuine |
| Facematch Verification (Facematch Verification - NIST) | Compares the selfie against the document photo |
| PEPs and Sanctions (PEPs and Sanctions Standard) | Screens the player against politically exposed person and sanctions lists |
| Address Verification (Global) | Confirms the address is real and matches the player |
| Financial Vulnerability (UK Financial Vulnerability) | Returns a risk signal used for safer gambling checks |
| Age Verification (US Source 2 (including DOB)) | Confirms the player meets the age requirement |
| Data Verification (UK: Single match all sources) | Matches the player's details against trusted data sources |
Select the **v2** variant of each document module, for example **Document Classification v2** rather than **Document Classification**. The v2 variants are built for this API.
For instructions, see [Configure modules](/docs/go-v2/platform/journey-builder/configure-module).
Address Verification takes the country from its own settings rather than from the player's address, so it needs setting before the journey runs.
1. Click the **Address Verification (Global)** module in the journey.
2. Click **Settings**.
3. In the **Country** field, enter the ISO3 code for the country you verify addresses in, for example `GBR`.
4. Click **Save all settings**.
ISO3 codes are the GO platform convention, so `GBR`, `FRA` or `DEU`. An ISO2 code such as `GB` is also accepted. For US addresses, use the dedicated US variant instead, which is certified for USPS DPV and CASS.
Add an **Evaluation** node after the modules and configure these three decisions. For how to add and configure one, see [Set up evaluation](/docs/go-v2/platform/journey-builder/set-up-evaluation).
| Decision | Classification | Match | Conditions |
| - | - | - | - |
| Reject | Negative | Any Match | PEPs and Sanctions is MATCH, Financial Vulnerability is High Risk, or Age Verification is Under Age |
| Manual review | Neutral | Any Match | Financial Vulnerability is Medium Risk, or Document Authentication is Medium Risk |
| Accept | Positive | Any Match | Document Classification is Document Classified, Document Extraction is Extraction Successful, Document Authentication is Low Risk, PEPs and Sanctions is NO MATCH, Financial Vulnerability is Low Risk, or Age Verification is Of Age |
Set the classification on each decision as shown. The application reads it to choose a result screen, where `positive` renders an approval, `negative` a decline, and `neutral` a referral to manual review.
Give each decision branch an **End of journey** node.
Click **Publish to Preview**. You'll see the confirmation message *Delivery deployed successfully*.
Use Preview while you build and test. Publish to Production when you're ready for real players. The application works the same against either, and only the resource ID changes.
Go to **Dashboard** in the Journey builder and copy the **Resource ID** and **Version number**.
You'll combine them as `@`, for example:
```
3e1582a0e437a4ceb5fffb0f9f1a0340cc4073d47cac7e034a97a92ba2115237@xn0ajeh5
```
Pin the exact version rather than using `@latest`. Every republish creates a new version, and a pinned application keeps running the version you tested until you change it deliberately.
## Part 2: Set up the backend
Clone the backend in the language you prefer. Both expose the same HTTP API, so the front end works with either.
```bash theme={null}
git clone https://github.com/gbgplc/go-sample-backend-java.git
cd go-sample-backend-java
```
`.env.local` is listed in `.gitignore`, so Git doesn't track it. Never commit your client secret, and never put it in `application-*.yml`.
Create a file named `.env.local` in the repository root:
```bash theme={null}
GBG_CLIENT_ID=your-client-id
GBG_CLIENT_SECRET=your-client-secret
```
Open `src/main/resources/application-ridgeline-play.yml` and set your journey:
```yaml theme={null}
app:
resource-id: your-resource-id@your-version
```
Start the service in live mode:
```bash theme={null}
./run.sh ridgeline-play live
```
It listens on `http://localhost:8083`. The script finds JDK 21, loads `.env.local`, and starts the right profile.
```bash theme={null}
git clone https://github.com/gbgplc/go-sample-backend-typescript.git
cd go-sample-backend-typescript
npm install
```
`.env.local` is listed in `.gitignore`, so Git doesn't track it. Never commit your client secret, and never put it in a market config.
Create a file named `.env.local` in the repository root:
```bash theme={null}
GBG_CLIENT_ID=your-client-id
GBG_CLIENT_SECRET=your-client-secret
```
Open `lib/config/markets/ridgelinePlay.ts` and set your journey:
```typescript theme={null}
resourceId: 'your-resource-id@your-version',
```
Start the service in live mode:
```bash theme={null}
npm run dev:ridgeline-play:live
```
It listens on `http://localhost:8083`.
Both backends also have a mock mode that needs no credentials, which is useful for working on the front end alone. The `live` command is what switches them to your real journey.
### Set your region
The samples default to the EU platform. If your tenant was provisioned elsewhere, then change the base URL and the region together:
Change both values. Authentication succeeds regardless of region, so a mismatch shows up later as journey calls failing against the wrong host.
In `application-ridgeline-play.yml`:
```yaml theme={null}
go:
region: us
base-url: https://us.platform.go.gbgplc.com/v2/captain/
```
In `lib/config/markets/ridgelinePlay.ts`:
```typescript theme={null}
go: {
region: 'us',
baseUrl: 'https://us.platform.go.gbgplc.com/v2/captain/',
},
```
## Part 3: Set up the front end
The front end is one repository holding three applications. This tutorial uses the gaming one.
```bash theme={null}
git clone https://github.com/gbgplc/go-sample-frontend.git
cd go-sample-frontend
npm install
```
Create `apps/ridgeline-play/.env.local`:
```bash theme={null}
NEXT_PUBLIC_ONBOARDING_TRANSPORT=rest
NEXT_PUBLIC_API_BASE_URL=http://localhost:8083
```
`NEXT_PUBLIC_*` values are compiled into the browser bundle. Never put credentials here. They belong in the backend's `.env.local`.
Start the front end:
```bash theme={null}
npm run dev:ridgeline-play
```
Open `http://localhost:3002`. With the backend already running, you'll land on the first screen of your own journey.
If you see the **Sign up** screen, the whole chain is working, from the browser through the front end and backend to GBG Go.
To understand the request flow the app uses, and how it renders screens from your journey, see [How the applications are built](/docs/go-v2/tutorials/sample-apps-overview#how-the-applications-are-built).
## Troubleshooting
This journey asks for six address components rather than the three some journeys use, so a screen plan written against a shorter address submits an incomplete element and the journey stays on that screen.
The screen plan doesn't recognise something the journey collects, so the app falls back to a plain form rather than stalling.
This usually means the journey changed after the plan was written. Check the backend log for `No screen mapped for outstanding elements`, which names the unmapped elements, then add them to the screen plan.
The journey's required fields changed under the same resource ID. A republish can add required elements, so an address that needed three components can come back needing six, and a screen plan written against the old shape submits an incomplete element.
Re-read `collects` after every republish rather than assuming the shape holds.
The backend keeps sessions in memory, so restarting it invalidates every session in progress. Start a new journey.
For the same reason, the samples run one journey per browser tab. The session ID lives in `sessionStorage`, so reloading resumes the journey, but a new tab starts a fresh one.
The region is mismatched. The token endpoint is global, so authentication works regardless, but journey calls go to a regional host. Check that `region` and `base-url` name the same region.
A module that errors is different from one that declines, because nothing was decided about the customer.
Open the journey in the [Investigation](/docs/go-v2/platform/investigate/overview) portal and look at the failing step. It carries an error code, a problem description, a suggested action, and a correlation ID. Quote the correlation ID when contacting support, because it identifies the exact execution.
## Next steps
See the journeys you ran, module by module, in the Investigation portal.
Change what each module reports, and how your evaluation turns those into decisions.
Move from Preview to Production when you're ready for real customers.
The full Journey API v2 reference.