> ## Documentation Index
> Fetch the complete documentation index at: https://docs.go.gbgplc.com/llms.txt
> Use this file to discover all available pages before exploring further.
# Identity document verification
> Invite a customer to a No-code journey that verifies their identity document.
This guide shows you how to verify a single customer's identity document. You build a Hosted journey from three document modules and add an Evaluation node that rejects a failed document. You then invite one customer by email or text message, and review the result in Investigation. You **don't** write any code or call the API.
By the end of this guide, you can see what document your customer submitted and whether it is genuine. You can also see the decision that the GBG Go platform reached.
The **Invite a customer** action is only available for published Hosted journeys. If your journey collects information before it starts, then the action is unavailable. See [When the invite action is unavailable](/docs/go-v2/get-started/quickstart/quickstart-invite-a-customer#when-the-invite-action-is-unavailable).
## Before you begin
Ensure you have the following:
* A GBG Go platform account with a customer admin role. This role lets you review the result in Investigation. If you don't have this role, then contact your GBG account manager.
* The Document Classification, Document Extraction, and Document Authentication modules enabled in your contract.
* A licence and credentials for the User Invite module set up for your organisation.
* An identity document that you can photograph, such as a passport or driving licence.
* An email address or mobile number that you can receive the invite on, so that you can complete the journey as your customer.
## How the document modules work together
Document verification uses three modules in sequence. Each one depends on the module before it, so the order matters.
| Order | Module | What it does |
| ----- | --------------------------- | ----------------------------------------------------------------------------------------------------------- |
| 1 | **Document Classification** | Identifies what the document is, for example, a passport or a driving licence, and which country issued it. |
| 2 | **Document Extraction** | Reads the data from the document, such as the name, date of birth, and expiry date. |
| 3 | **Document Authentication** | Checks whether the document is genuine and shows no signs of tampering. |
Classification runs first because the modules after it need to know the document type before they can apply the correct rules and templates.
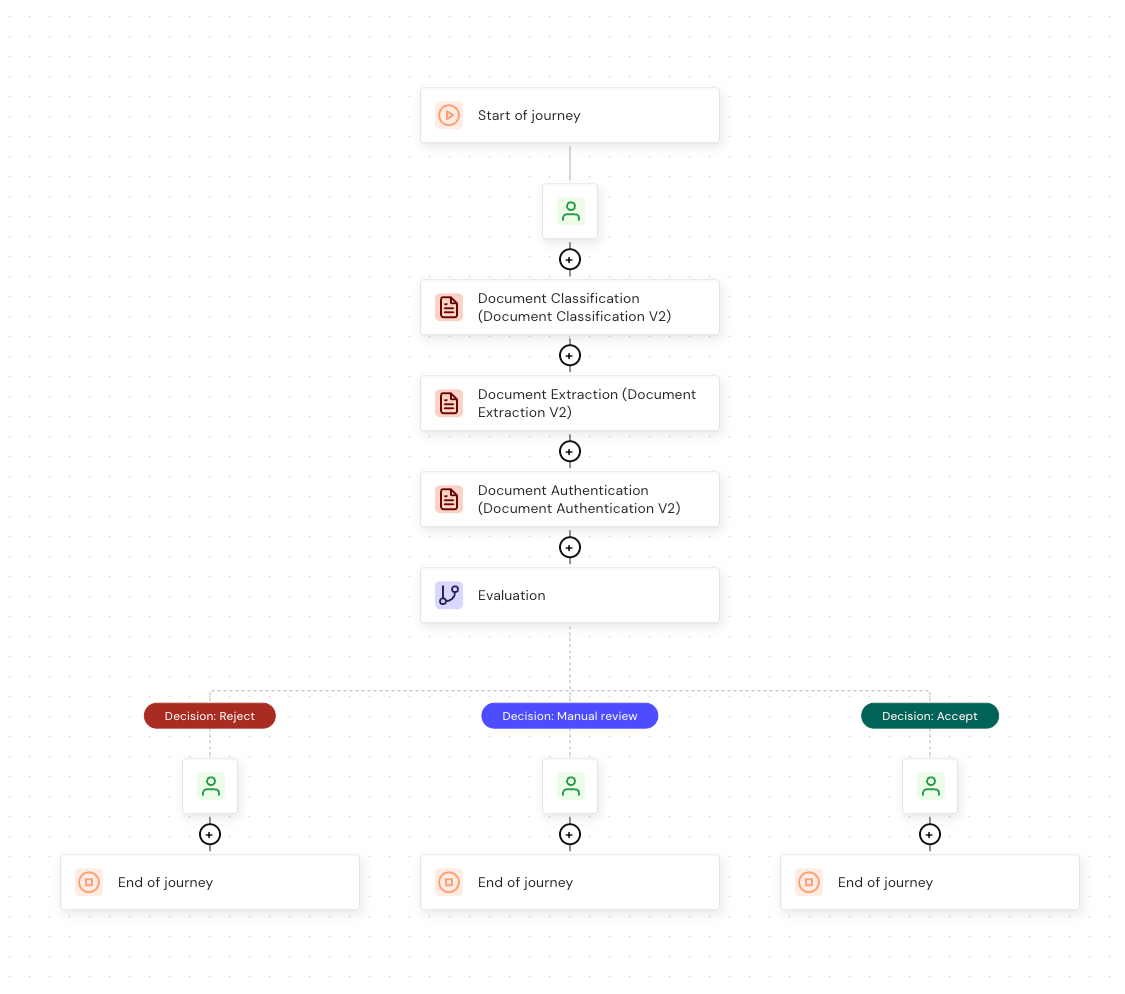 This guide uses the V2 variants of all three modules. The V1 variants of these modules are not available in v2. See [V1 to v2 migration guide](/docs/go-v2/migration/v1-to-v2-migration-guide).
## Step 1: Create a Hosted journey
1. Click on the **Create a new journey** list.
2. Select **API + hosted (latest)**. This opens the Journey builder, allowing you to design Hosted journey workflows.
3. Click the edit icon on the journey name at the top of the editor.
4. Enter a meaningful name, for example, "Identity Document Verification - New Customers."
5. Click outside the name field to save it.
## Step 2: Add the document modules
Add the three modules in order. You select a variant as part of adding each module.
1. Go to **Browse and add modules** in the right sidebar.
2. Use the search bar to find **Document Classification**.
3. Click the module. This opens the module configuration panel, which lists the available variants.
4. Select the **Document Classification V2** variant.
5. Click **Add to journey** to insert the module into the flow.
6. Repeat steps 1 to 5 for the remaining two modules, in this order:
| Module | Variant |
| --------------------------- | -------------------------- |
| **Document Extraction** | Document Extraction V2 |
| **Document Authentication** | Document Authentication V2 |
Your journey now runs classification, then extraction, then authentication, as shown in the previous image.
Modules and variants marked with an orange warning icon require activation by the GBG team. If a variant you need is marked, then contact your account manager to enable it for your organisation.
To compare the variants in detail, see [Document Classification](/docs/go-v2/platform/modules/documents/document-classification), [Document Extraction](/docs/go-v2/platform/modules/documents/document-extraction), and [Document Authentication](/docs/go-v2/platform/modules/documents/document-authentication).
## (Optional) Step 3: Configure the module outcomes
Each module returns an outcome, and each outcome is built from one or more rules. A rule tests a capability, which is a single data point the module produces. The defaults return a sensible outcome for each module, so you can skip this step and go to [Step 5](#step-5-add-an-evaluation-node).
Configure an outcome when you want it to run multiple checks. **Document Extraction V2** is a good example, because it has multiple capabilities that you can configure for a successful extraction.
By default, the **Extraction Successful** outcome tests the extraction result alone. A document can therefore extract successfully and still be expired. Adding the expiry status as a rule means a single outcome confirms both.
To add an expiry rule to the **Extraction Successful** outcome:
1. Click the **Document Extraction** module inside the Journey builder.
2. Click **Configure outcomes**.
3. Find the **Extraction Successful** outcome.
4. Click **Add rule**.
5. Select **Document Expiry Status** from the **Fields** list.
6. Set the operator to **is**, and then select **Not Expired** as the value.
In Investigation, you can then see whether the expiry rule returned true or false for that customer, alongside every other rule in the outcome. When the document is not expired and the extraction is successful, both rules return true, and you see the **Extraction Successful** outcome you configured. When the document is expired, the expiry rule returns false, and you see the unsuccessful outcome instead.
To learn more about outcomes, see [How to configure module outcomes in Go](/docs/go-v2/guides/product-guides/configure-outcome-decisions).
## (Optional) Step 4: Review the module settings
Each module has a configuration panel where you tailor it to your own use case. The defaults verify a document end to end, so you can skip this step and go to [Step 5](#step-5-add-an-evaluation-node).
1. Click a module inside the Journey builder to open its configuration panel.
2. Click **Settings** to review the options. For example, the **Document Extraction V2** settings let you decide which fields the module requires, and which it can ignore.
3. Click **Save all settings** to apply your configuration.
The Document Extraction settings control which fields are **required**, not which fields are read. The module always extracts every field it can. Turning a field off means a missing value no longer makes the extraction unsuccessful.
To learn more about module settings, see [How to configure module settings in Go](/docs/go-v2/guides/product-guides/configure-module-settings).
## Step 5: Add an Evaluation node
The three modules each return their own result. An Evaluation node reads those results together and reaches a single decision for the journey.
1. Go to **Browse and add modules** in the right sidebar.
2. Click **Routing**.
3. Select **Evaluation**, and then click **Add to journey**.
Evaluation adds three default decision paths: **Accept**, **Reject**, and **Manual review**.
## Step 6: Configure the reject decision
Configure the reject decision so that a customer is rejected when any one of the three modules fails. A document that cannot be classified, cannot be read, or looks tampered with is not a document you want to accept.
1. Click the **Evaluation** node inside the Journey builder.
2. Click **Configure decisions**.
3. On the **Decision: Reject** row, select **Any Match**. The decision then applies when any single condition is true.
4. Add the following three conditions:
| Module | Condition |
| --------------------------- | ---------------------------- |
| **Document Classification** | is `Document NOT Classified` |
| **Document Extraction** | is `Extraction Unsuccessful` |
| **Document Authentication** | is `High Risk` |
This guide uses the V2 variants of all three modules. The V1 variants of these modules are not available in v2. See [V1 to v2 migration guide](/docs/go-v2/migration/v1-to-v2-migration-guide).
## Step 1: Create a Hosted journey
1. Click on the **Create a new journey** list.
2. Select **API + hosted (latest)**. This opens the Journey builder, allowing you to design Hosted journey workflows.
3. Click the edit icon on the journey name at the top of the editor.
4. Enter a meaningful name, for example, "Identity Document Verification - New Customers."
5. Click outside the name field to save it.
## Step 2: Add the document modules
Add the three modules in order. You select a variant as part of adding each module.
1. Go to **Browse and add modules** in the right sidebar.
2. Use the search bar to find **Document Classification**.
3. Click the module. This opens the module configuration panel, which lists the available variants.
4. Select the **Document Classification V2** variant.
5. Click **Add to journey** to insert the module into the flow.
6. Repeat steps 1 to 5 for the remaining two modules, in this order:
| Module | Variant |
| --------------------------- | -------------------------- |
| **Document Extraction** | Document Extraction V2 |
| **Document Authentication** | Document Authentication V2 |
Your journey now runs classification, then extraction, then authentication, as shown in the previous image.
Modules and variants marked with an orange warning icon require activation by the GBG team. If a variant you need is marked, then contact your account manager to enable it for your organisation.
To compare the variants in detail, see [Document Classification](/docs/go-v2/platform/modules/documents/document-classification), [Document Extraction](/docs/go-v2/platform/modules/documents/document-extraction), and [Document Authentication](/docs/go-v2/platform/modules/documents/document-authentication).
## (Optional) Step 3: Configure the module outcomes
Each module returns an outcome, and each outcome is built from one or more rules. A rule tests a capability, which is a single data point the module produces. The defaults return a sensible outcome for each module, so you can skip this step and go to [Step 5](#step-5-add-an-evaluation-node).
Configure an outcome when you want it to run multiple checks. **Document Extraction V2** is a good example, because it has multiple capabilities that you can configure for a successful extraction.
By default, the **Extraction Successful** outcome tests the extraction result alone. A document can therefore extract successfully and still be expired. Adding the expiry status as a rule means a single outcome confirms both.
To add an expiry rule to the **Extraction Successful** outcome:
1. Click the **Document Extraction** module inside the Journey builder.
2. Click **Configure outcomes**.
3. Find the **Extraction Successful** outcome.
4. Click **Add rule**.
5. Select **Document Expiry Status** from the **Fields** list.
6. Set the operator to **is**, and then select **Not Expired** as the value.
In Investigation, you can then see whether the expiry rule returned true or false for that customer, alongside every other rule in the outcome. When the document is not expired and the extraction is successful, both rules return true, and you see the **Extraction Successful** outcome you configured. When the document is expired, the expiry rule returns false, and you see the unsuccessful outcome instead.
To learn more about outcomes, see [How to configure module outcomes in Go](/docs/go-v2/guides/product-guides/configure-outcome-decisions).
## (Optional) Step 4: Review the module settings
Each module has a configuration panel where you tailor it to your own use case. The defaults verify a document end to end, so you can skip this step and go to [Step 5](#step-5-add-an-evaluation-node).
1. Click a module inside the Journey builder to open its configuration panel.
2. Click **Settings** to review the options. For example, the **Document Extraction V2** settings let you decide which fields the module requires, and which it can ignore.
3. Click **Save all settings** to apply your configuration.
The Document Extraction settings control which fields are **required**, not which fields are read. The module always extracts every field it can. Turning a field off means a missing value no longer makes the extraction unsuccessful.
To learn more about module settings, see [How to configure module settings in Go](/docs/go-v2/guides/product-guides/configure-module-settings).
## Step 5: Add an Evaluation node
The three modules each return their own result. An Evaluation node reads those results together and reaches a single decision for the journey.
1. Go to **Browse and add modules** in the right sidebar.
2. Click **Routing**.
3. Select **Evaluation**, and then click **Add to journey**.
Evaluation adds three default decision paths: **Accept**, **Reject**, and **Manual review**.
## Step 6: Configure the reject decision
Configure the reject decision so that a customer is rejected when any one of the three modules fails. A document that cannot be classified, cannot be read, or looks tampered with is not a document you want to accept.
1. Click the **Evaluation** node inside the Journey builder.
2. Click **Configure decisions**.
3. On the **Decision: Reject** row, select **Any Match**. The decision then applies when any single condition is true.
4. Add the following three conditions:
| Module | Condition |
| --------------------------- | ---------------------------- |
| **Document Classification** | is `Document NOT Classified` |
| **Document Extraction** | is `Extraction Unsuccessful` |
| **Document Authentication** | is `High Risk` |
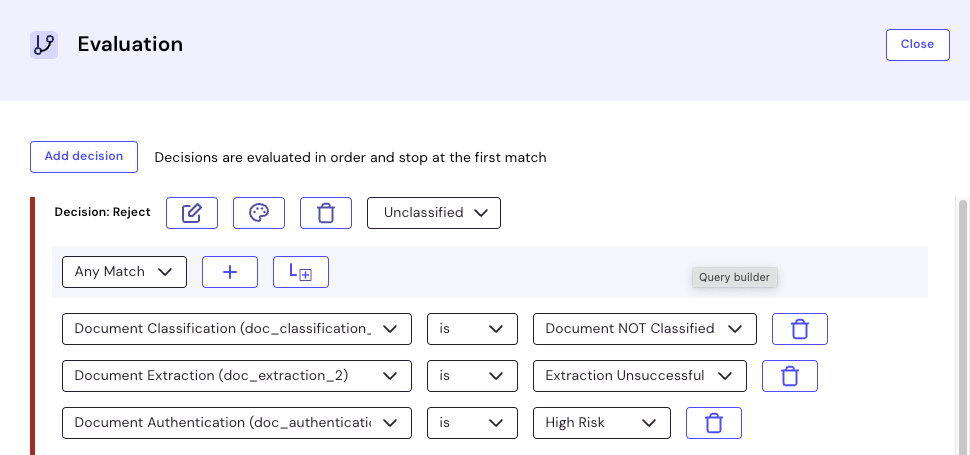 Decisions are evaluated in order and stop at the first match, so place the reject decision first. A customer who matches none of the three conditions falls through to your remaining decisions.
**Any Match** rejects the customer when any single condition is true. Select **All Match** instead if you only want to reject a customer who fails every check. You can also route these conditions to a manual review decision, if you would rather a reviewer judge the document. For document verification, **Any Match** is the safer choice, because one failed check is enough to make the document unreliable.
The values you select come from each module's own results:
| Value | What it means |
| ------------------------- | --------------------------------------------------------------------------------------------------------------------------------------- |
| `Document NOT Classified` | The document type could not be identified, for example, because the image was too poor or the document is not in the reference library. |
| `Extraction Unsuccessful` | One or more required fields could not be read from the document. |
| `High Risk` | The document passed the authentication and tamper checks only under the most relaxed criteria, so residual risk is elevated. |
To learn more about decisions, see [Set up evaluation](/docs/go-v2/platform/journey-builder/set-up-evaluation) and [How to configure evaluation decisions in Go](/docs/go-v2/guides/product-guides/configure-evaluation).
## Step 7: Publish the journey
Click **Publish to Preview** in the Journey builder. GBG Go displays a confirmation message.
Next, click **Dashboard** to see:
* Environment (Preview)
* Version number
* Resource ID
* Last published
* Actions list
Your journey is now available for testing in the preview environment.
## Step 8: Invite your customer
1. Click the **Actions** list.
2. Click **Invite a customer**. A dialog box appears.
Decisions are evaluated in order and stop at the first match, so place the reject decision first. A customer who matches none of the three conditions falls through to your remaining decisions.
**Any Match** rejects the customer when any single condition is true. Select **All Match** instead if you only want to reject a customer who fails every check. You can also route these conditions to a manual review decision, if you would rather a reviewer judge the document. For document verification, **Any Match** is the safer choice, because one failed check is enough to make the document unreliable.
The values you select come from each module's own results:
| Value | What it means |
| ------------------------- | --------------------------------------------------------------------------------------------------------------------------------------- |
| `Document NOT Classified` | The document type could not be identified, for example, because the image was too poor or the document is not in the reference library. |
| `Extraction Unsuccessful` | One or more required fields could not be read from the document. |
| `High Risk` | The document passed the authentication and tamper checks only under the most relaxed criteria, so residual risk is elevated. |
To learn more about decisions, see [Set up evaluation](/docs/go-v2/platform/journey-builder/set-up-evaluation) and [How to configure evaluation decisions in Go](/docs/go-v2/guides/product-guides/configure-evaluation).
## Step 7: Publish the journey
Click **Publish to Preview** in the Journey builder. GBG Go displays a confirmation message.
Next, click **Dashboard** to see:
* Environment (Preview)
* Version number
* Resource ID
* Last published
* Actions list
Your journey is now available for testing in the preview environment.
## Step 8: Invite your customer
1. Click the **Actions** list.
2. Click **Invite a customer**. A dialog box appears.
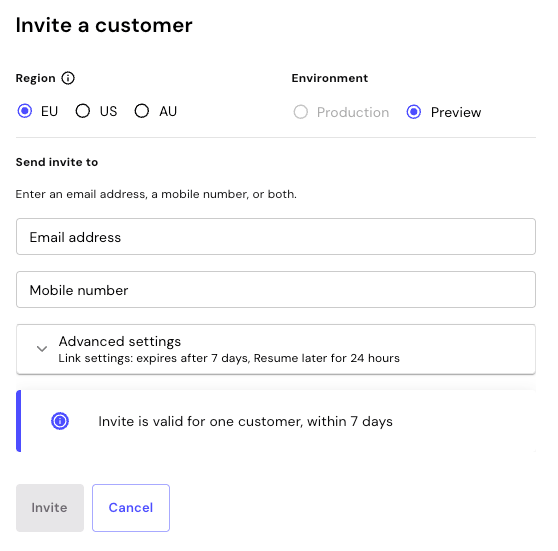 3. Select the options for your use case, and then enter an email address, a mobile number, or both. The dialog box contains the following options:
| Option | Description |
| --------------------- | --------------------------------------------------------------------------------------------------------------------------------------------------------------------------------------------- |
| **Region** | The region that the journey runs in. Select **EU**, **US**, or **AU**. Your organisation may only be set up in some regions. |
| **Environment** | The environment that the journey runs in. Select **Production** or **Preview**. If you can't select an environment, then the journey isn't published there yet. |
| **Send invite to** | Enter an email address, a mobile number, or both. |
| **Advanced settings** | The link expiry and session behaviour that the invite uses. Expand this to review the current values, which come from the [link settings](/docs/go-v2/platform/link-settings) on the journey. |
The GBG Go platform presets the region and environment based on the journey that you selected. Select **Preview** while you test the journey. Change the region only if your organisation runs journeys in more than one region, because the region controls where your customer's data is processed and stored.
4. Click **Invite**. A message appears at the top right of the screen confirming that the invite started.
An invite is valid for one customer. By default it expires after seven days, and your customer can return to the journey if they close it before they finish. To change either default, see [Link settings](/docs/go-v2/platform/link-settings).
## Step 9: Complete the journey as your customer
Your customer receives a verification link by email or text message.
1. Open the link from the invite.
2. Photograph your identity document when the journey asks for it. Capture both sides if the document is double-sided.
3. Submit the document.
Watch this demo to see the journey as your customer experiences it.
The GBG Go platform classifies the document, extracts its data, and checks whether it is genuine. The Evaluation node then reaches a decision.
Capture the document in good light, on a plain background, with all four corners visible. A poor image is the most common cause of a `Document NOT Classified` or `Extraction Unsuccessful` result.
## Step 10: Review the verification result
Results are available in Investigation once your customer completes the journey.
1. Click **Investigation** on the left navigation menu. The Investigation dashboard opens.
2. Select the environment that you sent the invite to. If you are testing, then click the **Preview Environment** tab.
3. Select the region that you sent the invite to, using the region list in the top-right corner.
4. Find your customer's session in the list. If the list is long, then click **Add Filter** to search by name or email address.
5. Click the session ID. The session details page opens on the **Processing** tab.
6. Review each module in turn. The outcome appears on the right of the module name, for example, **Extraction Successful**.
7. Click the arrow on a module row to expand it. The module shows each condition it evaluated, and whether that condition returned true or false.
| Module | What to look for |
| --------------------------- | ----------------------------------------------------------------------------- |
| **Document Classification** | The document type and issuing country, for example, a passport issued by GBR. |
| **Document Extraction** | The fields read from the document, and whether the document has expired. |
| **Document Authentication** | The risk level, and the number of forensic checks that failed. |
8. Click **More details** on an expanded module to drill into that module on its own page. The page presents the module's full result across several tabs. These include the images it processed, the checks it ran, and the rules that produced the outcome. The tabs differ by module.
3. Select the options for your use case, and then enter an email address, a mobile number, or both. The dialog box contains the following options:
| Option | Description |
| --------------------- | --------------------------------------------------------------------------------------------------------------------------------------------------------------------------------------------- |
| **Region** | The region that the journey runs in. Select **EU**, **US**, or **AU**. Your organisation may only be set up in some regions. |
| **Environment** | The environment that the journey runs in. Select **Production** or **Preview**. If you can't select an environment, then the journey isn't published there yet. |
| **Send invite to** | Enter an email address, a mobile number, or both. |
| **Advanced settings** | The link expiry and session behaviour that the invite uses. Expand this to review the current values, which come from the [link settings](/docs/go-v2/platform/link-settings) on the journey. |
The GBG Go platform presets the region and environment based on the journey that you selected. Select **Preview** while you test the journey. Change the region only if your organisation runs journeys in more than one region, because the region controls where your customer's data is processed and stored.
4. Click **Invite**. A message appears at the top right of the screen confirming that the invite started.
An invite is valid for one customer. By default it expires after seven days, and your customer can return to the journey if they close it before they finish. To change either default, see [Link settings](/docs/go-v2/platform/link-settings).
## Step 9: Complete the journey as your customer
Your customer receives a verification link by email or text message.
1. Open the link from the invite.
2. Photograph your identity document when the journey asks for it. Capture both sides if the document is double-sided.
3. Submit the document.
Watch this demo to see the journey as your customer experiences it.
The GBG Go platform classifies the document, extracts its data, and checks whether it is genuine. The Evaluation node then reaches a decision.
Capture the document in good light, on a plain background, with all four corners visible. A poor image is the most common cause of a `Document NOT Classified` or `Extraction Unsuccessful` result.
## Step 10: Review the verification result
Results are available in Investigation once your customer completes the journey.
1. Click **Investigation** on the left navigation menu. The Investigation dashboard opens.
2. Select the environment that you sent the invite to. If you are testing, then click the **Preview Environment** tab.
3. Select the region that you sent the invite to, using the region list in the top-right corner.
4. Find your customer's session in the list. If the list is long, then click **Add Filter** to search by name or email address.
5. Click the session ID. The session details page opens on the **Processing** tab.
6. Review each module in turn. The outcome appears on the right of the module name, for example, **Extraction Successful**.
7. Click the arrow on a module row to expand it. The module shows each condition it evaluated, and whether that condition returned true or false.
| Module | What to look for |
| --------------------------- | ----------------------------------------------------------------------------- |
| **Document Classification** | The document type and issuing country, for example, a passport issued by GBR. |
| **Document Extraction** | The fields read from the document, and whether the document has expired. |
| **Document Authentication** | The risk level, and the number of forensic checks that failed. |
8. Click **More details** on an expanded module to drill into that module on its own page. The page presents the module's full result across several tabs. These include the images it processed, the checks it ran, and the rules that produced the outcome. The tabs differ by module.
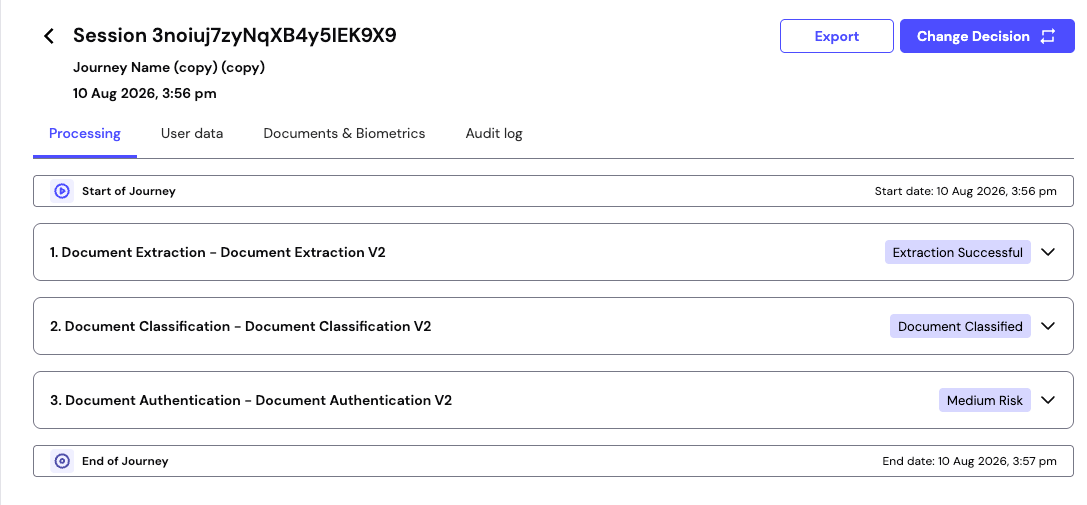 You have now verified a customer's identity document and reviewed the result.
When a journey rejects a document, read the individual module outcomes before you act on the decision. A `Document NOT Classified` result usually means a poor photograph, and the customer can succeed on a second attempt. A `High Risk` authentication result is a stronger signal, because the document itself failed forensic checks.
## Next steps
* Change the decision on a session after your review: [Change decisions](/docs/go-v2/platform/investigate/change-decisions).
* See everything a session records: [View details of a journey session](/docs/go-v2/platform/investigate/view-journey-details).
* Understand the results each module returns: [Document Classification](/docs/go-v2/platform/modules/documents/document-classification), [Document Extraction](/docs/go-v2/platform/modules/documents/document-extraction), and [Document Authentication](/docs/go-v2/platform/modules/documents/document-authentication).
* Add a biometric check to the same journey: [Documents and biometrics](/docs/go-v2/guides/best-practices/docs-and-bio).
* Invite a customer to a journey built for another verification task: [No-code guides](/docs/go-v2/low-code-builder/no-code/overview#guides).
You have now verified a customer's identity document and reviewed the result.
When a journey rejects a document, read the individual module outcomes before you act on the decision. A `Document NOT Classified` result usually means a poor photograph, and the customer can succeed on a second attempt. A `High Risk` authentication result is a stronger signal, because the document itself failed forensic checks.
## Next steps
* Change the decision on a session after your review: [Change decisions](/docs/go-v2/platform/investigate/change-decisions).
* See everything a session records: [View details of a journey session](/docs/go-v2/platform/investigate/view-journey-details).
* Understand the results each module returns: [Document Classification](/docs/go-v2/platform/modules/documents/document-classification), [Document Extraction](/docs/go-v2/platform/modules/documents/document-extraction), and [Document Authentication](/docs/go-v2/platform/modules/documents/document-authentication).
* Add a biometric check to the same journey: [Documents and biometrics](/docs/go-v2/guides/best-practices/docs-and-bio).
* Invite a customer to a journey built for another verification task: [No-code guides](/docs/go-v2/low-code-builder/no-code/overview#guides).