> ## Documentation Index
> Fetch the complete documentation index at: https://docs.go.gbgplc.com/llms.txt
> Use this file to discover all available pages before exploring further.
# How to manage authentication methods
> Update or switch your multi-factor authentication methods in GBG GO using the self-service portal.
You can manage your multi-factor authentication (MFA) methods in the GO self-service portal. This portal allows you to update your authentication method if you switch devices or need to use a different authenticator app.
This guide shows you how to manage your MFA methods using the self-service portal.
## When to manage authentication methods
You may need to manage your authentication methods when:
* You get a new mobile device and need to transfer your authenticator app.
* You want to switch to a different authenticator app.
* You lose access to your current authentication device.
* You lose access to your current authentication device.
* You need to set up MFA for the first time.
## Before you begin
Ensure you have:
* Access to the GO [self-service](https://login.auth.gbgplc.com/myaccount/) portal.
* Your new authentication device or app with you, if you’re setting up a new method.
If you have lost access to your authentication device and cannot log in, then contact your administrator or the GBG support team for assistance.
## Step 1: Remove an existing authentication method
Follow these steps to remove your current authentication method:
1. Go to the GO [self-service](https://login.auth.gbgplc.com/myaccount/) portal and log in with your credentials.
2. Navigate to the **AUTHENTICATION** tab at the top of the page.
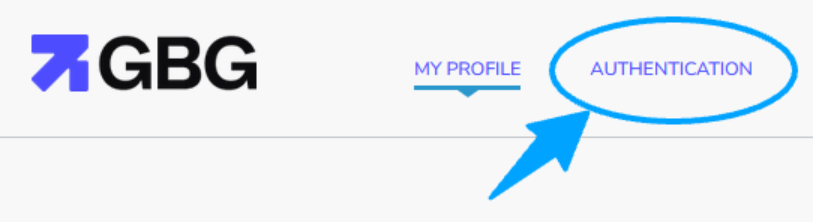 3. You will see your connected authenticator app listed under **YOUR AUTHENTICATION METHODS**.
4. Click the three vertical dots next to the default authentication method. This reveals a list of options.
3. You will see your connected authenticator app listed under **YOUR AUTHENTICATION METHODS**.
4. Click the three vertical dots next to the default authentication method. This reveals a list of options.
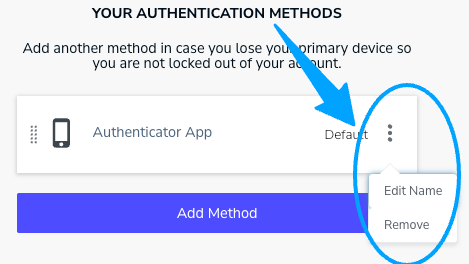 5. Click **Remove**.
6. Click **OK** on the dialog that appears to confirm the removal.
This removes your current authentication method. The next time you log in to your GO account, you will be prompted to set up a new authentication method. Alternatively, you can add a new authentication method directly in the self-service portal. You can also edit the authentication name by clicking **Edit Name**.
## (Optional) Step 2: Add authentication method
Follow these steps to add an authentication method:
1. Complete steps 1–3 in the [Step 1: Remove an existing authentication method](#step-1-remove-an-existing-authentication-method) section.
2. Click **Add Method**. A dialog appears, prompting you to select a new authentication method.
5. Click **Remove**.
6. Click **OK** on the dialog that appears to confirm the removal.
This removes your current authentication method. The next time you log in to your GO account, you will be prompted to set up a new authentication method. Alternatively, you can add a new authentication method directly in the self-service portal. You can also edit the authentication name by clicking **Edit Name**.
## (Optional) Step 2: Add authentication method
Follow these steps to add an authentication method:
1. Complete steps 1–3 in the [Step 1: Remove an existing authentication method](#step-1-remove-an-existing-authentication-method) section.
2. Click **Add Method**. A dialog appears, prompting you to select a new authentication method.
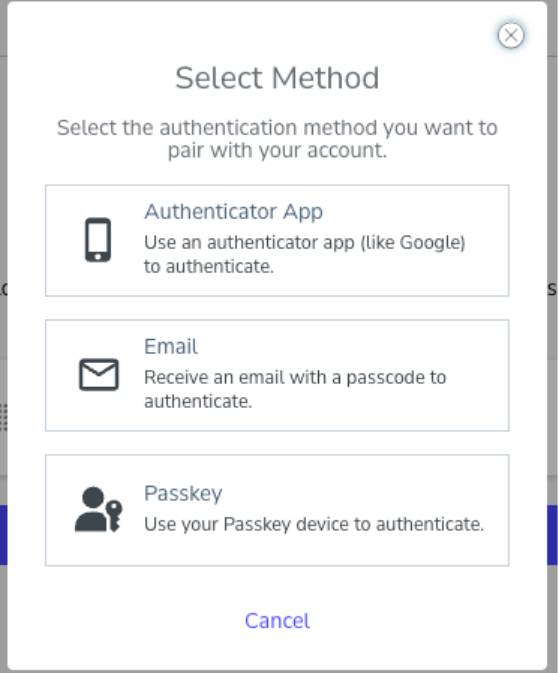 3. Select an authentication method from the list. You will be guided through the setup process for your chosen method.
Follow the on-screen instructions to complete the setup. This may involve scanning a QR code with an authenticator app or entering an authentication code sent to your email.
3. Select an authentication method from the list. You will be guided through the setup process for your chosen method.
Follow the on-screen instructions to complete the setup. This may involve scanning a QR code with an authenticator app or entering an authentication code sent to your email.